What is jQuery
jQuery is a fast, small, and feature-rich JavaScript library . Its purpose is to make using JavaScript on your website much simpler and easier. jQuery takes a lot of common tasks that to accomplish, require many lines of JavaScript code and wraps them into methods that you can call with a single line of code. It also simplifies more complex JavaScript processes, like AJAX calls and DOM manipulation, and is one of the most popular JavaScript libraries. The jQuery library contains the following features:
- HTML/DOM manipulation
- CSS manipulation
- HTML event methods
- Effects and animations
- AJAX
- Utilities
Getting started with jQuery
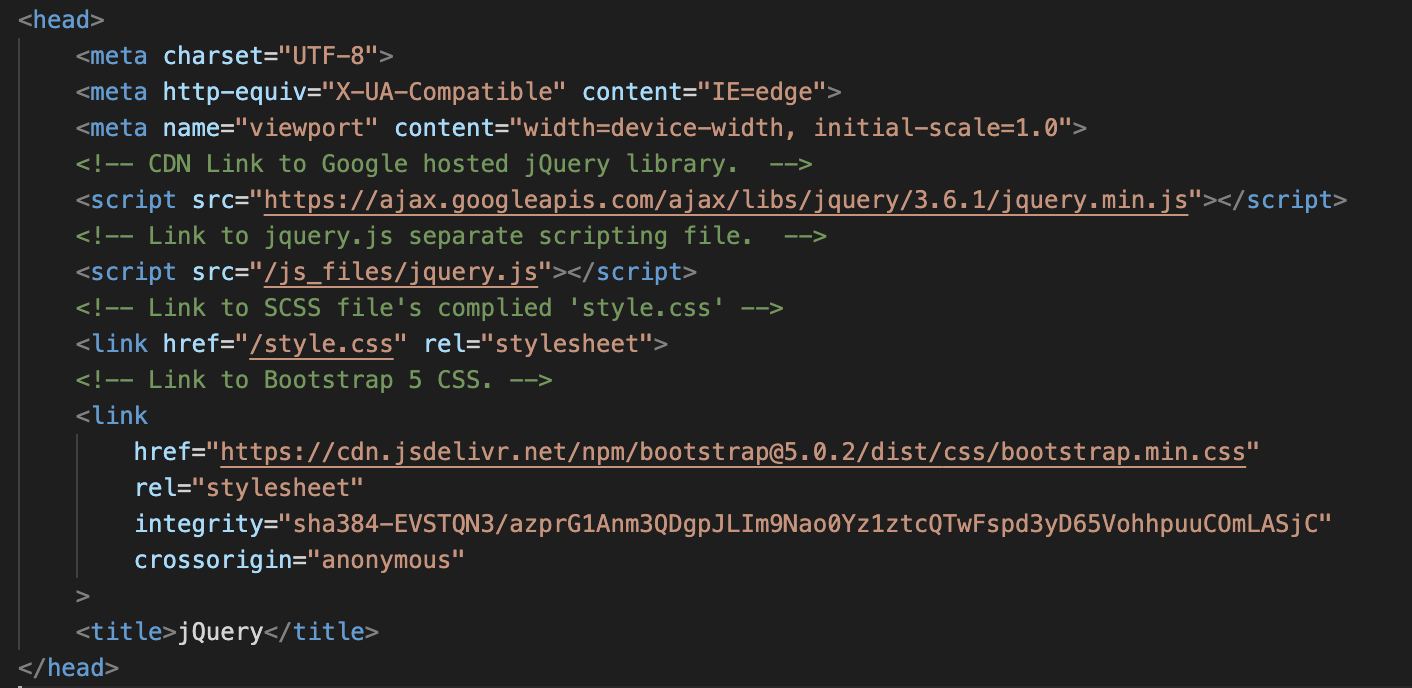
The jQuery library is a single JavaScript file, which is referenced with the HTML <script> tag (this should be inside the <head> tag's section). It can also be included from a CDN (Content Delivery Network), instead of downloading and hosting it yourself, such as Google's hosted version. Using the hosted (CDN) version from Google is advantageous because many users already have downloaded jQuery from Google or Microsoft when visiting another site. As a result, it will be loaded from a cache when they visit your site, enabling faster loading time. Additionally, most CDN's will make sure that once a user requests a file from it, it will be served from the server closest to them, enabling faster loading time. ( Programming in JavaScript IV: jQuery, HyperionDev 2021 )
Separate scripting files
It is generally recommended to use separate script files rather than having the script within your HTML file. This allows for efficient code layout and readability. To create a separate scripting file for your HTML as well as incorporating the jQuery library, place it inside the <head> tag's section. For example the image below shows this page's HTML code, with the CDN and separate scripting file placed in the <head> tag.
jQuery Syntax
With jQuery you select (or query) HTML elements and perform "actions" on them . The jQuery basic syntax looks like this:
$(selector).action()
Where:
- The $ sign defines/accesses jQuery.
- The (selector) queries (i.e. finds) the HTML elements.
- The action() is the jQuery action to be performed on the element/s.
Some examples are:
- $(this).hide() - hides the current element.
- $("p").hide() - hides all <p> elements.
- $(".test").hide() - hides all elements with class="test".
- $("#test").hide() - hides the element with id="test".
Functions in jQuery
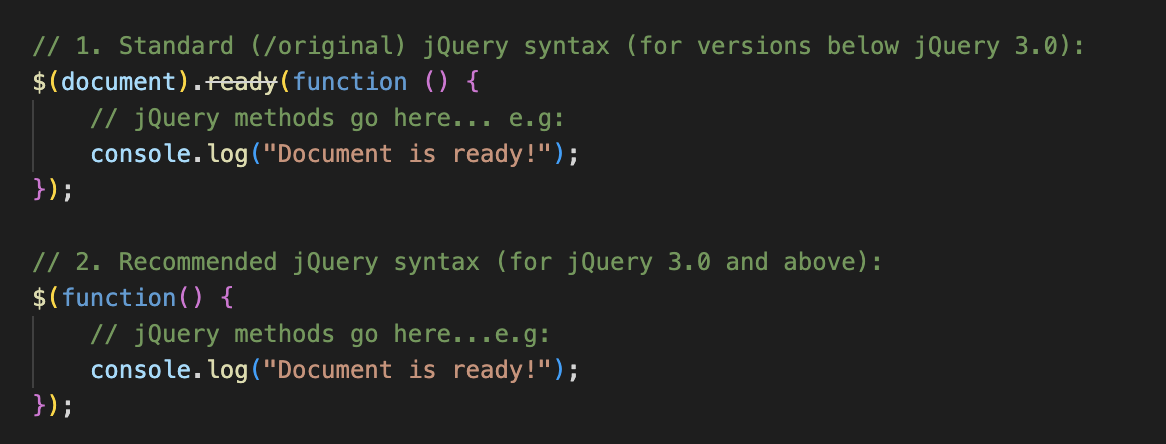
Everything in jQuery happens thanks to functions ( Programming in JavaScript IV: jQuery, HyperionDev 2021 ). It is important to remember that functions should only operate once a document has completely loaded. This prevents any jQuery code from running before the document is finished loading (i.e. is 'ready'). We can do this by wrapping all our jQuery methods inside a document ready event. We can write this function declaration with either the standard jQuery definition (example 1 below), or with a shorter method that does the same thing (example 2 below). Note that as of jQuery 3.0, only the first syntax is recommended; the other syntaxes still work but are deprecated ( jQuery API Documentation ). Since this page is using a later version of jQuery, example 1 below displays the ready function as deprecated (strikethrough).
jQuery Selectors
jQuery selectors are one of the most important parts of the jQuery library ( Programming in JavaScript IV: jQuery, HyperionDev 2021 ). They allow you to select and manipulate HTML elements. We use selectors to find HTML elements based on their name, ID, classes, types, attributes, values of attributes and more, giving us full control over how the webpage functions. jQuery selectors are based on the existing CSS Selectors, along with its own customised selectors. All selectors in jQuery start with the dollar sign and parentheses: $(). Some of the most common selectors are described below.
- The ID selector: finds an HTML element based on its assigned ID attribute. For example, you could select a specific element attributed the ID “example” with the code $(“#example”).
- The class selector: selects HTML elements based on which class attribute it has been assigned to. For example, you could select specific elements with the class “example” using the code $(“.example”).
- Other selectors: element, class and ID selectors are the three most commonly used jQuery selectors, and a wide range of other variations can be created with them. Some additional jQuery selectors include $("*"), which Selects all elements, $(this), which selects the current HTML element, $(“div.last”), which selects div elements with class=“last”, $(“button”), which selects all button elements, and $(“[href]”), which selects all link-based elements. For a full list of interactive selectors, checkout w3schools websites.
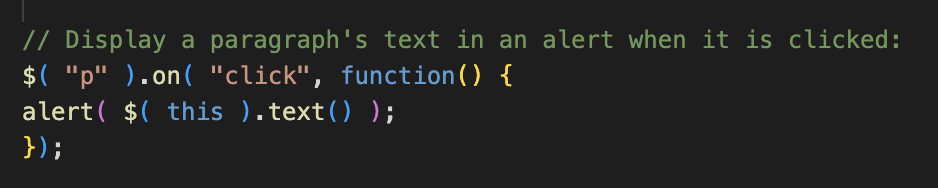
jQuery Events
jQuery is tailor-made to respond to events in an HTML page. Events are all the user actions that a web page can respond to, for example moving or hovering the mouse over an element, selecting from a dropdown menu, clicking on an element or keyboard button. Events are represented by some action, and jQuery generates a response at the exact moment that the action occurs. Examples of common events used in jQuery are:
| Mouse Events | Keyboard Events | Form Events |
|---|---|---|
| Click | Key press | Submit |
| Double click | Key down | Change |
| Mouse enter | Key up | Blur |
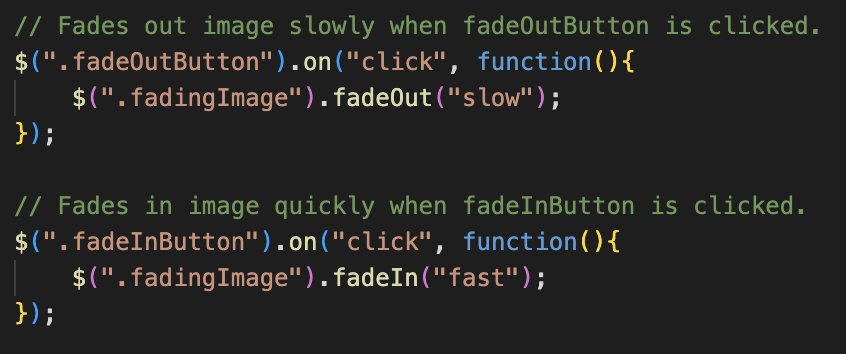
jQuery Effects
Effects can be described as actions which do something to HTML elements on your web page ( Programming in JavaScript IV: jQuery, HyperionDev 2021 ). jQuery makes it easy to add simple, standard animations and effects to your web page, as well as create more sophisticated custom effects . Examples of common effects used in jQuery can be found below:
| Effect | Description |
|---|---|
| Hide | Hides the selected element |
| Show | Reveals the selected element |
| Fade | Fades the element in or out |
| Animate | Animates some property of the element |
| Stop | Stops any effect of an element |
jQuery Event syntax
Effect methods are implemented in the following order ( Programming in JavaScript IV: jQuery, HyperionDev 2021 ):
- Select the object where the event will occur
- Specify the type of event
- Create a function to carry out the effect
- Specify and customise the desired effect
Effect chaining
jQuery allows us to chain actions all into a single command, which allows for endless possibilities. However, commands should make sense when being executed in this order ( Programming in JavaScript IV: jQuery, HyperionDev 2021 ). Below is an example of a chained effect command that will select a button, change its colour, slide it down the page, and then back up again: